As promised here are some basic instructions for water bath canning.
First things first:
What is Water Bath Canning?
Water bath canning is a method of preserving high-acid foods to be shelf-stable (without refrigeration) and safe to eat even months after preparing.
What are high-acid foods?
Many fruits are high in acid naturally and many canning recipes call for adding lemon juice, vinegar, or citric acid to lower the ph. Foods with a total ph of 4.6 or lower are considered safe for water bath canning. Less acidic foods require pressure canning which is not what I will be addressing here.
Clostridium botulinum bacteria adore low acid environments but have a hard time surviving the heat and acidic conditions within properly processed water bath canned goods.
The applesauce that I made for this tutorial had a ph of 3.0 even with pureeing the peels in water and adding them back to the pot with all the apple pieces.
How does canning work?
By filling sterile jars with food and then boiling the lightly tightened jars several things happen.
First the heat kills any bacteria that may have somehow gotten in, or be there in the case of cold pack (raw) foods.
Second, with the lids only lightly fastened, the small amount of air in the headspace (the empty space at the top, or head of the jar) expands and actually excapes the jar leaving a vacuum. When the jars are removed and the lids fastened tight, the cooling contents create a seal on the jar preventing bacteria from entering.
The hissing pop noise when opening any canned good for the first time is air rushing back in to fill the vacuum created during processing.
Food spoilage is caused by those bacteria that you've just killed and trapped out thus making food that is shelf stable and safe to eat far longer than any fresh food. This shelf stable preservation also does not require continued electricity in the form of refrigeration or freezing.
What equipment do I need to start water bath canning?
As I said in my post about my favorite canning books, ll you need is some basic equipment, much of which you may already have.
Stuff you probably already have: a flat bottom non-reactive pot, kitchen towel, gloves, scraper spatula, ladle or spoon of some kind.
Specific to canning: canning jar lifter (the fancy red and black thing in the middle, canning jars (make sure they're specifically for canning as not all glass jars are manufactured for canning), jar bands and lids. Most years I use a mix of "regular" canning lids and the reusable tattler lids and rings. Many canning instructions recommend a canning rack as well.
I do have some gorgeous Weck jars and while the science is the same, the process of using those lids is slightly different so I won't be showing them here.
Ok, I've got the stuff. How do I get started?
Here are the steps:
1.) Follow a canning-safe recipe for what you want to can. I'll be showing the steps with basic applesauce.
I core and peel apples. With a little added water, I puree the peels in my blender and add that puree back to the apple pieces in the pot and cook it until it it's a nice saucy consistency.
While some people do raw pack (commonly called "cold pack" but it's somewhat of a misnomer) for things like raw tomatoes, I almost never can anything that isn't already hot. The added safety of a fully cooked and sterile food makes this process a little more fool-proof.
2.) Get everything together. Gather your equipment, and mise en place - put everything in its place.
Make sure to put a towel down on your work surface. This will both absorb any trickles of water but also cushion your jars throughout the process.
Canning jars, commonly called Mason jars after John Landis Mason who patented them in 1858, come in two basic opening sizes: Wide Mouth and Regular Mouth.
The jars come in a variety of sizes with standard 1/4 pint (like 4oz jam jars), 1/2 pints (8oz), pints (16oz), and quarts (32oz) being most common.
Make sure you have new lids (the insert that covers the jars) and the correct size bands for your jars. New canning jars most often come with the new lid and band (also called the "ring") and so you're all set to go! Metal canning lids can only be used once.
I use a combination of the standard metal Ball lids (new each year) and reusable BPA free Tattler lids and replace the rubber rings as necessary. The metal lids are recyclable in many locations but that plastic, while newly BPA free, ends up trash somewhere. I appreciate knowing that the rubber Tattler rings can be reused unless they are obviously damaged or fail to seal. This means more upfront cost but savings over time as well as less entering a recycling stream.
Packaging for the lids each contain basic canning instructions. One major difference between the types is that the updated plastic on the inside of the metal lids (the part that actually seals) no longer needs to be heated while the rubber seal for the tattle lids need to be "scalded and kept warm" as per the instructions.
Even though they don't actually require it, I still place the metal lids in their individual bands and keep them wet and warm in a small pan of water. As you'll see in the instructions below, it's handy to have them right near by, contained in a single location, and with warm water at the ready for wiping the jar rims.
Ok, I have my recipe ready, and everything in its place. How the heck do I actually can?
1.) Put your jars in your metal, non-reactive pot. Stainless steel works great and I know many who have a large pot just for canning.
A lot of sources state that you must have a canning rack (like a cooling rack for baking) to put into the bottom of the pot and insist that you will have a lot of jars breaking if you do not have one.
I've never found this to be the case. Granted I use a high quality heavy-bottom pot. If you feel more comfortable having your jars off the bottom of the pot or only have thin-bottomed pots, go ahead and get a canning rack. They're inexpensive and many people swear by them.
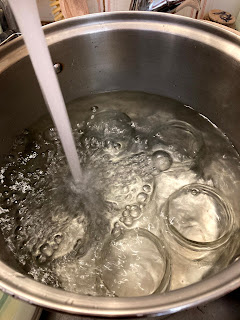
2.) Fill and cover the empty lidless jars with at least an inch of water above the rims. You want to have the jars under a minimum of an inch of boiling water the entire processing time.
Once the filled and lidded jars return to the water bath, the water will rise so make sure your pot is tall enough to accommodate. It's better to have too much water than too little. When I first started canning, I often boiled a teakettle of water as well as the canning pot to make sure I could add boiling water if necessary without lowering the temperature of the processing water.
Here are my jars covered with water, the edge of my applesauce, and my lids in their rings ready to go.
Without a rack, the jars will rattle. While this may be unnerving at first, I find it both satisfying and useful to help keep track of if and when the water is actually burning.
3.) Boil the empty jars for 10 minutes to kill any bacteria. The water needs to be a rolling boil for the entire time.
If you have an electric stove, like mine, you'll need to make sure the temperature setting on the burner is high enough that the water doesn't dip below boiling at any point during the on/off cycle of the burner.
Using canning tongs, empty and lift the jars out of the water, leaving the burner on to keep the water hot.
I usually turn the burner down while removing and returning jars in order to keep risk of being splashed to a minimum.
4.) Using a funnel, carefully fill the jar. Safe canning recipes will include the amount of necessary headspace. Applesauce has a mere 1/4 inch headspace as it's fairly smooth and liquidy.
I take the jars out one at a time and as soon as one jar is filled, move the funnel to a new clean jar. After each jar is filled I put on their lid and band ( steps 5 and 6) and then fill the next jar.
After the last jar is filled I simply put the funnel in the sink.
Make sure to take your time. There's no rush–to steal a phrase, slow is accurate and accurate is fast.
5.) With a clean cloth, dip a little of the cloth in the lid pan water and carefully wipe the rim of the filled jar with the wet cloth.
This serves two functions, any accidental food on the rim will prevent the jar from sealing and moisture is required for a proper seal. This required moisture is another reason I still heat even the metal lids in warm water prior to use.
6.) Place the band and tighten to "finger tight." It's important that air be able to exape the headspace during processing.
I usually tighten the band fully, loosen it until it gives way and then tighten it just slightly. It sounds a little funny but once you have the jar in your hands it makes more sense.
You can practice with a cold jar to get the feel for it before you have lid piping hot food in a piping hot jar.
7.) Once all the jars are filled and lightly tightened, return them all to the hot water bath.
Depending on the contents, size of the jar, and even altitude, canning recipes will specify how long to process the jars once the water has returned to a boil. Generally this will be 10 minutes for 1/4 pints and 1/2 pints, 15 minutes for pints, and 20 minutes for quarts, adjusting for altitude and certain recipes.
8.) Once your jars have been fully processed. Remove them from the water and immediately tighten the band completely. This will keep the vacuum intact and allow the jars to seal properly as the jars cool.
One neat and quite satisfying feature of the metal lids is that there's an audible PLINK! as the concave lids seal into place.
There is no plink with the tattler lids but I find the ecological benefits of reusable lids to outweigh the satisfaction of the plink.
Let jars cool completely before moving - this can take a surprisingly long amount of time. I generally leave jars in place for a minimum of 12 hours.
9.) After the jars have cooled completely, test their seal.
You do this by removing the band and lifting each jar slightly by the lid.
While the bands are not required for even long-term storage, I tend to replace the bands as a matter of protection for the rims as well as aesthetics.
10.) Lable/mark your jars with the contents and the date. Most instructions will say that the contents are good for a year (similar to frozen foods) but I knew few canners who stick to that rule.
If the food is still good, why waste it? It's pretty easy to tell if it's still safe to eat.
You may think you'll remember the contents or that it will be obvious from looking at it, but even if many things didn't look remarkably similar, knowing the date is both a matter of knowing how long it's been there and, at least for me, pride.
Jars should be stored at room temperature in a dark place to minimize light exposure. A cupboard is perfect.
How do I know if it's still safe to eat?
If there's any discoloration at the top of the jar, prior to unsealing, you can decide if you want to just toss the entire jar's contents or scrape off the miscolored top and heat the contents above boiling for 10 minutes.
I've made some darned good dishes with canned goods that were questionable to eat as I'd originally intended. Various last jars of chutneys have ended up on bbq sauces, applesauce turned to apple butter, and jams added to fruit in pies.
If you go to open a jar, even without discoloration, and the lid isn't sealed, heat the contents (as above) or discard.
Also, if it smells funny or off, don't eat it. The nose knows.
What happens if a jar breaks in the canner?
First of all, it's glass. Even the most seasoned (hah!) canner has a jar break every now and then.
Here's what you do: Carefully remove and rinse any intact jars.
Using a drain catch (so you're not getting glass down the drain) filter out the broken glass from the water murky with the contents of the broken jar.
Rinse the canning pot and refill with water.
Replace the unbroken jars and reprocess for the entire amount specified in the recipe.
What happens if a jar doesn't seal?
If a jar doesn't seal, I simply re-process it.
I usually leave my canning pot with its water on the stove until I've tested all my jars for their seal. I reboil the water, put the jar back in with a new lid or seal, and reprocess the jar for the time specified in the recipe.
I've even found jars of food unsealed after a month or two and simply followed the above instructions with a new lid and then remarked them with the new processing date.
-
These are my basic steps for Canning 101. If anyone would be interested in a video class or even a live workshop, let me know.
As the classic saying goes, I eat local all year because I can!


No comments:
Post a Comment