Monday, July 25, 2011

Quick Cucumber Salad - CSA Veggie Challenge

-

Between our veggie CSA and our own garden we have lots of cucumbers! We've been enjoying blueberry cucumber smoothies, cucumber and dip, and of course, cucumber salad! 


Basic recipe:

Cucumbers!
2T to 4TVinegar - I find cider or rice works best
1/4t to 1/2t (or less!) Sweetener - I like maple best
pinch of salt
fresh ground black pepper (optional)

Directions:

Slice the cucumbers - the thinner the slices the tastier the salad! 

In the past I've used a vegetable peeler, the slicer side of our grater, or in a pinch, just a knife. If you're in the market for mandoline slicer but don't want to pay those kind of prices, I highly recomment Feemster's Famous Vegetable Slicer. I've had mine for a couple of years use it almost daily during the height of veggie season.

Mix all ingredients together. For best results, refrigerate for ten to fifteen minutes before serving.


-

Wednesday, July 20, 2011

Kitchen Blackboard

-

It's been quite a while since I discovered the existence of blackboard paint  - paint that creates a blackboard surface. While I enjoy the idea of a blackboard wall (how I originally saw the paint used), our kitchen has no feasible walls for this purpose. After one of the last kitchen-reorganizations we ended up with a big empty space on one wall.

(taken at night) 


I had thought we would put up a piece of art and set about the 
patient task of waiting to find the right piece. 

I then saw Edgefield Farm's farmer's market signs and I knew I'd found our answer. Now I just needed a frame to make it look nice. As I wanted a rounded frame, and not just a standard square, I knew my best bet would be to find one used. While doing some errands in Brattleboro, VT, we popped in to the local hospice thrift store and right there on the first table was an oval mirror with a beautiful frame!

It definitely needed some love so I removed the mirror and spent a bit of time gluing, sanding, and treating the wood frame. I added a notched wood bar across the back and voila!


I am so delighted to have such a beautiful addition to our kitchen 
and look forward to having yet another simple creative outlet.

-

Thursday, July 14, 2011

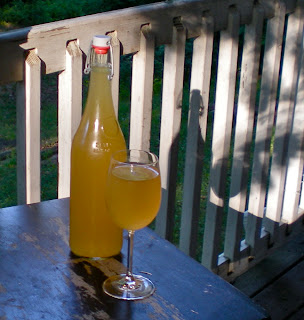
Homemade Hard Cider - made with wild yeast

-

Hard cider is not only delicious and easy to make, it is a traditional and historic New England beverage. While I only find some of the commercial ciders worth drinking, they hardly compare to the crisp, slightly sweet and bubbly beverage one can make for oneself. 


My first experience with homemade cider several years ago was definitely an inspiration. While doing a min-internship at Wood's Cider Mill (of The Cider House Rules fame) in Vermont, Willis, a dear family friend, brought out some of his own. Since then I've compared every hard cider to his. This Autumn, we plan on bringing several glass carboys up to test our hand at hard cider made from the very best fresh cider. In the mean time, we'll continue with the delicious alternative described with directions below.


To make hard cider, you first need to make a yeast starter.
To do this you'll need apple juice or sweet cider (with NO preservatives in it. Citric acid is ok, but nothing else!) some empty plastic bottles and a few organic apples. It's important that they be organic otherwise they won't have the yeast still on their skins. Choose one each of a few different kinds of apples. Each will have a different yeast on its skin and you want a few choices as invariably at least one will fail or not be as pleasant.

I am pretty hardcore against plastic, but in this case the plastic bottles really do make a difference. It's pretty difficult to squeeze glass bottles to check for pressure and I didn't want to wait until I could go out and buy a fermentation airlock or have one shipped. Instead I use a simplified version made with supplies I already have in the house - see below.

To collect the yeast:
Do NOT wash the apples. Peel the apples and put the peels from each apple into it's own bottle. Add a good amount of apple juice and seal tightly. Leave in a dark, room temperature space such as a cupboard.


Check your mixtures daily and in about a week, you will have your starter! 

Things to check for: 

1.) Pressure on the bottle - within about two days, if the yeast is active, the bottle will start to become firm. Release the pressure daily allowing the yeast to work on the sugars in the juice.

2.) A pleasant smell. Your nose knows! If, at any point, the gas released from the bottle smells rotten or "off", it IS. Discard this bottle's contents. It should smell slightly sweet, a little yeasty, and pleasant.

If, after the week, you have more than one bubbly, pressured, sweet smelling starter than congratulations! You can either pick a favorite, keep a backup, or contrast and compare!

3.) Mold. If there is mold, regardless of how it smells (but it will probably smell bad) discard this bottle's contents.


Now you have your yeast starter mix. At this point you can remove the peels as they've done their job.

Next, mix 1/2c or so of this mix with apple juice (without preservatives!) in a fresh bottle. Leave an inch or so of headspace.

Cover the opening of the bottle with plastic wrap and secure with a rubber band. To make a homemade airlock, puncture the taught plastic wrap with a toothpick making a single small hole.


Place bottles back into the dark room temperature spot. If you are keeping any of your starter, make sure to feed it with some new apple juice and keep it in the fridge. If you use all of your starter, or don't want to keep it, you can always use the last bit of your cider from the bottom of the hard cider bottle.

At a normal room temperature, leave the bottle for 5 days for slightly sweet hard cider and 7 days for a sharper cider. When it's fermented to your taste remove the plastic wrap and seal tightly with a cap. Leave for one more day at room temperature to recharge and then refrigerate! In the refrigerator this capped cider should last anywhere up to several months. Both the pressure and the cold stop the yeast and preserve this delightful concoction at approx 2% alcohol.

When you're ready to drink it, open carefully and enjoy! 

The final inch or so of liquid (and any sediment) at the bottom of the bottle can be used to make another batch. This basic recipe also works well with other types of juices. At a recent party I opened a bottle made with orange juice and must say it was spectacular!


At the time I started experimenting with homemade hard cider, the only available organic apples were not even grown on this continent. I look forward to making hard cider with local cider and yeast from local apples. Then we will truly have a local delight!

-

Tuesday, July 12, 2011

Cilantro Chutney - CSA Veggie Challenge

-

If you're one of those people who doesn't like cilantro, I apologize and suggest you skip the rest of this post. 

For the rest of you, read on!


In last week's Veggie CSA share, we got a large bunch of cilantro. What the heck do you do with this much cilantro? Cilantro chutney!

Cilantro chutney is the delicious green sauce often found next to the tamarind sauce at our local Indian restaurants. I knew I liked it but never knew that it was cilantro (with mint) or that it was this easy to make!


 In your blender or food processor, blend/process ingredients until smooth.

Ingredients:
1c fresh cilantro,  packed
1/4c chopped onion*
healthy shake or two of dried red pepper (hot), or similar*
1T fresh mint
small clove garlic*
1/2t lemon juice
1t maple
1/4t salt
3T water
black pepper
1/4t coriander 

*optional - see bottom of post.

Fun fact: cilantro leaves and coriander 
seeds come from the same plant: Coriandrum sativum


We ate about 1/4 of the recipe with some freshly heated naan bread and froze the remaining in an ice cube tray to enjoy at a later date!

This recipe is a conglomeration of a slew of online recipes that used only ingredients I had on hand. Many recipes called for using up to half as much fresh mint as cilantro but I used what I had. I look forward to experimenting with proportions in future batches.

* Items marked with * were only found in some of the recipes I used for inspiration. I happen to like these ingredients and can eat them so I included them.

-

Saturday, July 9, 2011

Painting the Livingroom - Another pre-party project

-

One of my big goals for the summer break from school was to paint my living room.
All the other rooms in the living space of our house have gotten some attention. Our living room however had been sadly neglected, even though it's one of the most used rooms.


Taking inspiration from several memorable rooms my mother has painted over the years as well as the traditional lazure-style painting of my waldorf school classrooms, I decided to experiment. 


I am so thrilled with the result. It is so delightful to be drawn to a room and have one of our main environments be an inspiration rather than merely ignore it mumble about its neglect.

-

Thursday, July 7, 2011

A coop for the girls

-

These last few weeks have been a little crazy. On this past Saturday we had about 30 people over for a graduation/promotion/celebration party for my husband. One of the big projects we wanted to get done before the party was to get the chickens out of the house (more pre-party projects in subsequent posts). As tempted as we were to open the door and toss them out (they were getting kind of loud!), we figured it would be better to give them a house of their own. 


We got the final hardware on and chicken wire stapled up the morning before the party, and out they went! It took a few days of showing them what to do (to use the ramp to get in and out, to use the roosts for sleeping etc) before they really got it on their own. They've never been so happy to be chickens!


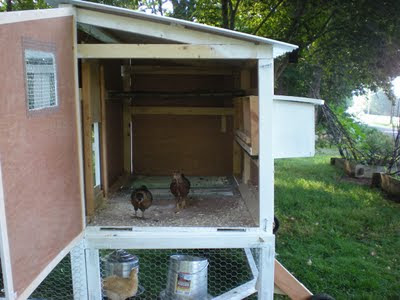
Noteworthy items shown above: 
1.) Ventilation: chickens need lots of fresh air but not drafts of cold so we added a window in the door and a mesh area under their roosts which also allows the droppings to fall to the ground. 
2.) Sliding door that opens via rope and pulley accessible from outside the coop. 
3.) Nesting boxes with landing strip across the front. The roof of the boxes lifts up from the exterior for egg collection when the girls mature. 
4.) sheltered area under the coop for food and water. This allows the girls more outdoor space without a larger footprint for the portable coop. Another benefit is that at night, chickens feel more secure when they're a few feet off the ground. 
5.) Safety latches: racoons are pretty clever little buggers and can figure out many types of latches and bolts.
6.) Wheels! While it will be a little cumbersome until we can put some sort of extendable handle bars on, I can move the coop by myself. Which is a necessity for us as I will be the primary chicken-mover. Throughout the growing season they will get moved once or twice a week to a fresh spot on our property.


Here is a shot from their first day in the coop. Because they didn't have a mother to show them the works, the first few nights we lifted them by hand. Now, less than a week later, they each get up there on their own and snuggle in for the night.

-